How to Rotate Camera in Blender in 5 Easy Steps
To rotate your camera smoothly in Blender, first add an empty object at your desired pivot point. Next, parent the camera to this empty with “Object Keep Transform.”
Then, insert keyframes on the empty’s Z-axis rotation from 0 to 360 degrees across your timeline. Change the keyframe interpolation to linear for consistent orbit speed.
Finally, switch to camera view and play the animation to see your camera glide around the pivot. Follow the steps ahead to refine your animation further.
Key Takeaways
- Add an empty object at the focal point to serve as the camera pivot for rotation.
- Parent the camera to the empty object using “Object Keep Transform” to maintain position.
- Insert keyframes on the empty’s Z-axis rotation from 0° to 360° to animate rotation.
- Set interpolation mode to “Linear” in the Graph Editor for smooth, constant rotation speed.
- Preview the animation by switching to camera view and playing the timeline for orbit effect.
Add an Empty Object as Camera Pivot in Blender
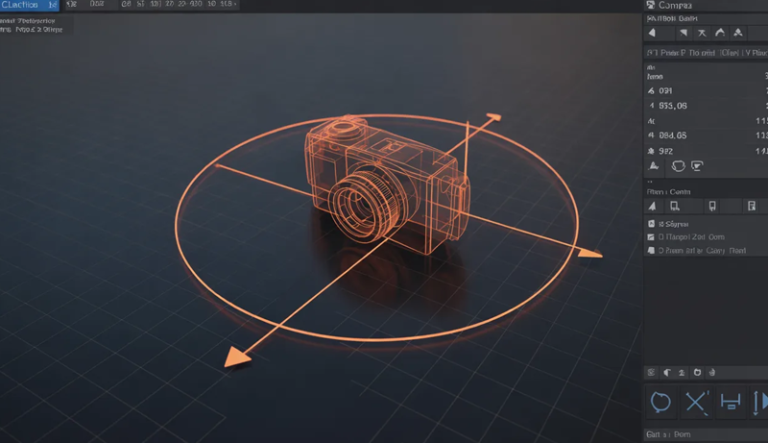
To set up a precise camera pivot in Blender, start by adding an empty object as the rotation center. Press Shift + A, select “Empty,” and choose “Plain Axes” for clear visualization.
Position the empty exactly at the center of the object you want to orbit. This guarantees smooth, balanced rotation around your subject. This empty acts as the pivot point for your camera, allowing precise control over its movement.
If you need to adjust the empty’s position or shape for better alignment, feel free to do so.
Should you have any questions or want to investigate anything else related to this setup, let me know. This step lays the foundation without parenting the camera yet. Stay tuned for that next.
Parent the Camera to the Empty for Easy Rotation
Parenting the camera to the empty object streamlines rotation control in Blender. Select the camera first, then hold Shift and select the empty. Press Control + P and choose “Object Keep Transform” to maintain the camera’s position relative to the empty.
This setup lets you rotate the empty, moving the camera smoothly around your focal point. A connecting line visually confirms the parent-child link. Here’s a quick reference:
| Step | Action |
|---|---|
| 1 | Select camera |
| 2 | Shift + select empty |
| 3 | Press Control + P |
| 4 | Choose “Object Keep Transform” |
| 5 | Confirm connecting line for parenting |
This method guarantees precise, easy orbiting without altering the camera’s original placement.
Animate the Empty’s Rotation With Keyframes

Once you select the empty object, press ‘I’ and choose ‘Rotation’ to set a keyframe at the starting frame with the empty’s Z-axis rotation at 0 degrees.
Next, move the timeline cursor to frame 100. Rotate the empty object along the Z-axis to 360 degrees, then press ‘I’ again and choose ‘Rotation’ to insert the second keyframe. This creates a full 360-degree rotation animation over 100 frames.
At frame 100, rotate the empty 360° on Z-axis and insert a rotation keyframe.
Make sure your camera remains parented to the empty so it follows the rotation smoothly.
You can preview the animation by pressing the spacebar to play the timeline, watching the camera orbit around the target as the empty rotates.
This keyframe setup forms the foundation for animating camera rotation efficiently in Blender.
Set Linear Interpolation for Smooth Rotation
Three simple steps will help you set linear interpolation for your camera’s rotation in Blender.
First, open the Graph Editor and select the keyframes controlling your camera’s rotation.
Next, press the ‘T’ key to open the interpolation menu.
Finally, choose “Linear” to guarantee the camera rotates at a constant speed between keyframes. This adjustment prevents acceleration or deceleration, producing a smooth, consistent orbit.
For a full rotation, set your initial keyframe at 0 degrees and the final at 360 degrees.
Linear interpolation ensures the camera moves steadily through this range, creating a visually pleasing sweep.
Remember to review your animation afterward to confirm the rotation’s smoothness and make adjustments if needed.
This precise control improves your camera’s orbit, enhancing the overall animation quality.
Preview the Camera Orbit Animation
To effectively preview the camera orbit animation, you need to guarantee the camera is controlled by an empty object rotating around your target. Set keyframes on the empty’s Z-axis rotation from 0° to 360°, using linear interpolation for uniform speed.
Press 0 to switch to camera view, then play the animation to watch the camera smoothly orbit the object. Disable viewport overlays for an unobstructed view of the movement.
| Step | Action |
|---|---|
| Parent Camera | Attach camera to empty object |
| Keyframe Rotation | Z-axis rotation: 0° to 360° |
| Interpolation | Set to Linear for steady motion |
| Preview | Press 0, play animation, disable overlays |
Frequently Asked Questions
Can I Rotate the Camera Around Multiple Axes Simultaneously?
Yes, you can rotate the camera around multiple axes simultaneously in Blender. Just adjust the rotation values in the transform panel or set keyframes for each axis on the timeline.
For smoother control, parent the camera to an empty object and rotate the empty around different axes.
Using the “Track To” constraint helps the camera focus while rotating.
You can fine-tune rotations with Euler angles or quaternions for precise, complex movements.
How Do I Reset the Camera Rotation to Default?
To totally twist your camera back to its typical tilt, tap `Alt + R` while selecting it in Object Mode. This clears all rotation, restoring the camera’s default direction.
You can also manually modify rotation values to zero in the Transform panel (press N).
If you wish to wipe out the whole world-wandering, hit `Alt + G` to reset the location.
For a menu move, choose “Object” > “Clear” > “Clear Rotation.”
Is It Possible to Control Rotation Speed Dynamically?
Yes, you can control the camera’s rotation speed dynamically in Blender.
Adjust keyframe spacing or tweak interpolation curves in the Graph Editor to vary speed.
Use Python scripts or drivers linked to rotation properties for real-time control based on distance or input.
You can also apply Animation Nodes for complex, math-driven speed changes.
This lets you create smooth or abrupt speed shifts visually tied to your scene’s needs.
Can I Use This Method for Orthographic Cameras?
Absolutely, you can use this method for orthographic cameras.
Imagine your camera smoothly circling an object, maintaining its flat, distortion-free look.
By parenting the orthographic camera to an empty object, you control the rotation effortlessly.
Set keyframes on the empty’s Z-axis to animate the orbit, and tweak the orthographic scale to keep the framing just right as it moves.
This technique preserves the orthographic view while adding dynamic rotation.
How Do I Export the Camera Rotation Animation?
To export your camera rotation animation in Blender, first confirm your camera’s rotation keyframes are set.
Go to the Render Properties tab, choose your output format (like FFmpeg for video), and specify the output folder.
Then, from the Render menu, select “Render Animation.”
Blender will process your frames into a video file stored in your chosen directory, ready for playback or further editing.
Conclusion
Now that you’ve anchored your camera to an Empty and mastered keyframe animation, your view orbits like a planet in perfect harmony. With smooth, linear interpolation, every rotation flows seamlessly, turning static shots into dynamic journeys.
Preview your work and watch your scene come alive, as if you’re steering a cinematic spaceship. Keep practicing these steps, and you’ll command Blender’s camera with the precision and grace of a seasoned pilot.