How to Move Camera in Blender (Beginner to Pro Guide)
Camera movement plays a huge role in how a scene feels, whether it’s a cinematic animation, a product render, or a simple walkthrough. In Blender, learning to control the camera smoothly helps transform static visuals into engaging stories that feel intentional and professional.
Many beginners struggle with camera control at first because Blender offers several ways to move and adjust it. From basic navigation to precise positioning, understanding these tools builds confidence and speeds up the creative process. A well-placed camera instantly improves composition and clarity.
This guide on how to move camera in blender focuses on practical methods that artists actually use while working. It covers viewport navigation, keyboard shortcuts, and direct manipulation techniques that make camera movement feel natural instead of frustrating.
Mastering camera movement also helps maintain consistency across scenes and animations. Once these fundamentals become second nature, creating dynamic shots feels effortless, allowing more time to focus on lighting, materials, and storytelling rather than fighting the controls.
Understanding the Camera in Blender
Understanding the camera in Blender is essential for creating scenes that look intentional and visually appealing. The camera acts as the viewer’s eyes, deciding what is seen, what is hidden, and how the final render feels. Without a clear understanding of how the camera works, even well-modeled scenes can appear flat or confusing.
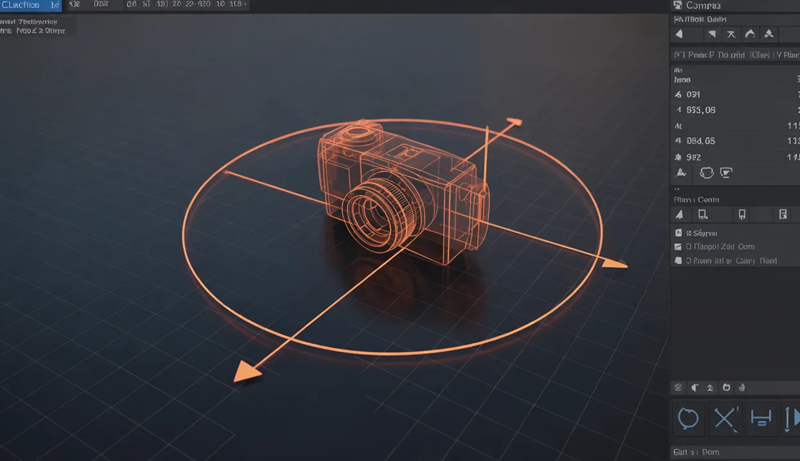
In Blender, the camera is treated like a physical object inside the 3D space. It has a position, rotation, and scale just like any other object, which means it must be placed thoughtfully within the scene. What the camera sees is exactly what gets rendered, making its setup a critical step before final output.
One of the most important aspects of the camera is its perspective settings. Blender allows control over focal length, which directly affects how wide or zoomed-in a shot appears. A lower focal length creates a wide-angle look, while a higher value produces a more focused, cinematic feel. These settings influence depth and realism.
Clipping distances are another key feature to understand. The camera has near and far clipping values that determine how close or far objects can be before they disappear from view. Incorrect clipping settings can cause objects to vanish unexpectedly, especially in large or detailed scenes.
The camera also works closely with composition tools such as framing, rule of thirds, and depth of field. These features help guide the viewer’s attention and add realism to renders. When used correctly, they elevate the overall visual impact.
By understanding how the camera behaves and how its settings affect the final image, creators gain better control over storytelling, realism, and visual flow within Blender projects.
How to Select the Camera in Blender
Selecting the camera in Blender is a basic but crucial skill that directly affects how efficiently you work in a scene. Whether you are framing a shot, adjusting composition, or preparing for a final render, knowing how to quickly and accurately select the camera saves time and reduces confusion. Blender offers multiple ways to select the camera, each suited to different workflows and experience levels.
Selecting the Camera from the Viewport
The most visual way to select the camera in Blender is directly from the 3D Viewport. Since the camera exists as an object in the scene, it can be selected just like meshes, lights, or other elements. This method is especially helpful when you want to work intuitively and see exactly where the camera is positioned.
To select the camera from the viewport, locate the camera object, which appears as a pyramid-like frame with a triangle tail. Left-click on it to make it active. When selected, the camera outline turns orange, indicating it is the active object. This visual feedback helps confirm that you are adjusting the correct object.
In complex scenes, the camera can sometimes be hidden behind other objects. Rotating the viewport or switching to wireframe mode can make it easier to spot. Zooming out also helps when the camera is positioned far from the main scene elements.
Viewport selection is ideal during layout and composition stages. It allows you to immediately move, rotate, or scale the camera using transform tools. This hands-on approach feels natural and is commonly used by artists who prefer visual control over technical navigation.
However, this method relies heavily on scene visibility. If the viewport becomes cluttered, finding the camera may take extra time, making alternative selection methods more efficient in larger projects.
Selecting the Camera Using the Outliner
The Outliner provides a structured and organized way to select the camera, especially in scenes with many objects. This panel lists every object in the scene, making it easy to locate the camera without searching visually in the viewport.
In the Outliner, the camera is represented by a small camera icon next to its name. Clicking on this entry instantly selects the camera, even if it is hidden or outside the current viewport view. This makes the Outliner one of the fastest and most reliable selection methods.
Using the Outliner is particularly useful when working with multiple collections. Cameras can be placed into dedicated collections for better organization. Selecting the camera from its collection helps maintain a clean workflow and reduces accidental object selection.
Renaming the camera also improves efficiency. Instead of relying on the default name, descriptive names like “Main Camera” or “Close-Up Camera” make identification quicker. This is especially helpful in scenes with multiple cameras.
The Outliner-based selection method emphasizes precision and control. It is favored in professional workflows where scenes are large, layered, and carefully organized. This approach minimizes errors and keeps navigation predictable.
Selecting the Camera Using Keyboard Shortcuts and View Controls
Keyboard shortcuts offer a fast and efficient way to interact with the camera once it is selected. While there is no single shortcut to directly select the camera by default, Blender provides shortcuts that work in combination with selection methods.
Pressing the Numpad 0 key switches the viewport to the active camera view. If the camera is already selected, this immediately shows what the camera sees. If not, it still allows you to identify which camera is active in the scene.
Once in camera view, selecting the camera becomes easier because its frame is clearly visible. You can then click the camera border to make it active. This workflow is commonly used during framing and animation adjustments.
Another useful approach involves locking the camera to the view. After selecting the camera, enabling “Lock Camera to View” allows navigation controls to move the camera itself. This makes selection and adjustment feel seamless.
Keyboard-based workflows are ideal for users who prefer speed and minimal mouse movement. Over time, combining shortcuts with viewport and Outliner selection methods creates a smooth and efficient camera control process.
Selecting the Camera in Scenes with Multiple Cameras
In scenes with more than one camera, selection becomes more important and slightly more complex. Blender allows multiple cameras, but only one can be active for rendering at a time.
To select a specific camera, the Outliner becomes especially valuable. Each camera appears as a separate object, making it easy to click and activate the desired one. Visual selection alone can be confusing when cameras overlap.
Switching the active camera can be done after selecting it, ensuring the correct view is used for rendering. This workflow is common in animation, architectural visualization, and cinematic scenes.
Naming and organizing cameras into collections prevents mistakes. When cameras are clearly labeled, selecting the correct one becomes straightforward and stress-free.
Managing camera selection carefully ensures smooth transitions between shots and avoids rendering from the wrong perspective, maintaining consistency throughout the project.
How to Move the Camera Using Keyboard Shortcuts
Moving the camera using keyboard shortcuts in Blender is one of the fastest ways to control framing and composition. It allows precise adjustments without constantly switching tools, making the workflow smoother and more efficient. Once shortcuts become familiar, camera movement feels natural and responsive, especially during scene setup and animation.
To start, the camera must be selected. After selecting it, the basic transform shortcuts come into play. Press G to move the camera freely, R to rotate it, and S to scale it. While moving or rotating, pressing X, Y, or Z locks the transformation to a specific axis, giving better control over positioning. This is useful when aligning the camera horizontally or adjusting height without disturbing other angles.
One of the most powerful shortcuts is Numpad 0, which switches the viewport to camera view. This shows exactly what the camera sees, making it easier to adjust framing accurately. While in camera view, pressing G and R still works, allowing you to fine-tune movement directly from the camera’s perspective. This method is ideal for composing shots and checking alignment.
For more intuitive control, enabling Lock Camera to View is extremely helpful. After selecting the camera and pressing N to open the sidebar, turning on this option allows normal viewport navigation shortcuts to move the camera itself. Using the mouse along with Shift and Ctrl while navigating makes subtle adjustments easy.
Keyboard shortcuts are especially effective for animators and artists who value speed. With practice, moving the camera using shortcuts becomes second nature, reducing interruptions and keeping the creative flow intact.
How to Move Camera in Camera View
Moving the camera in camera view is one of the most effective ways to frame a scene accurately in Blender. This method allows you to see exactly what the camera sees while making adjustments, which helps avoid guesswork and improves composition. It is especially useful when fine-tuning shots for rendering or animation.
To begin, switch to camera view by pressing the Numpad 0 key. This instantly displays the scene from the active camera’s perspective. From here, selecting the camera ensures that any movement or rotation directly affects the final view. This approach makes it easier to judge framing, depth, and object placement.
Once in camera view, enabling the Lock Camera to View option provides smoother control. This setting allows normal viewport navigation to move the camera itself. As you pan, zoom, or rotate the view, the camera follows these movements, making adjustments feel intuitive and precise.
Using transform shortcuts in camera view also enhances control. Pressing G to move and R to rotate the camera while viewing through it helps align subjects perfectly within the frame. Axis locking can be used to refine movements without disrupting the overall composition.
Camera view movement is particularly helpful for detailed scenes where precision matters. It allows creators to quickly correct framing issues, maintain visual balance, and ensure the final render matches their creative intent.
By working directly in camera view, users gain better control over composition and perspective, making the camera feel like an active creative tool rather than a static object.
How to Adjust Camera Position Using Properties Panel
Adjusting the camera position using the Properties Panel in Blender gives precise, numerical control over how the camera is placed in a scene. This method is ideal when accuracy matters, such as matching exact angles, aligning shots consistently, or refining camera placement without relying on manual movement. Understanding this panel helps maintain control in both simple and complex projects.
Using Location Values to Position the Camera
The Location settings in the Properties Panel allow direct control over where the camera sits in 3D space. Instead of moving the camera freely in the viewport, you can enter exact numerical values for the X, Y, and Z axes. This is especially useful when you need consistent camera placement across scenes or multiple renders.
By adjusting these values, the camera can be moved forward, backward, left, right, or vertically with precision. Small changes in numbers result in subtle movements, making it easier to fine-tune framing without overshooting the desired position.
Location values are helpful in architectural visualization and product renders where symmetry and alignment are important. Matching camera height or distance becomes straightforward when using numbers instead of visual estimation.
This approach also reduces errors caused by accidental rotations or off-axis movement. Since only position values are changed, the camera orientation remains untouched unless adjusted separately.
Using location fields builds a more controlled workflow, especially when exact positioning is required for animation consistency or scene matching.
Adjusting Camera Rotation from the Properties Panel
Camera rotation determines where the camera is pointing, and the Properties Panel offers full control over this through rotation values. These values define how the camera is angled along the X, Y, and Z axes, allowing precise directional adjustments.
Instead of rotating the camera manually in the viewport, entering rotation values helps achieve exact angles. This is useful when aligning the camera to specific objects or matching a reference shot.
Small numeric changes can subtly alter the camera’s view, making it easier to fine-tune composition. This level of control is ideal for cinematic framing where even slight angle differences matter.
Rotation values are also beneficial when multiple cameras must share similar angles. Copying and pasting rotation numbers ensures consistency across shots without guesswork.
Using the Properties Panel for rotation reduces reliance on visual alignment and increases accuracy, especially in technical or professional workflows.
Combining Location and Rotation for Precise Framing
Using location and rotation together allows complete control over camera placement. This combination ensures the camera is not only positioned correctly but also aimed precisely where it needs to be.
By adjusting location first and rotation second, you can methodically build the perfect camera setup. This structured approach avoids accidental distortions that sometimes occur with free movement.
This method is particularly useful in animation, where camera positions must be repeatable across frames. Numerical values ensure the camera behaves predictably throughout the timeline.
It also helps when recreating shots or revisiting older projects. Saved values can be reused, maintaining visual consistency without starting from scratch.
Combining both settings creates a disciplined workflow that favors accuracy, stability, and repeatable results in complex scenes.
Fine-Tuning Camera Placement with Transform Precision
The Properties Panel allows micro-adjustments that are difficult to achieve through viewport movement alone. Fine-tuning position and rotation values helps correct minor framing issues without disrupting the overall setup.
This is useful when objects appear slightly off-center or when spacing feels uneven in the final render. Small numerical tweaks can quickly correct these issues.
Precision adjustments are also valuable in large scenes where manual movement feels imprecise. The Properties Panel ensures consistent control regardless of scene scale.
Working this way reduces reliance on repeated trial and error. Each adjustment is intentional and measurable, saving time during refinement stages.
Using transform precision through the Properties Panel enhances accuracy, making it an essential tool for detailed camera positioning workflows.
How to Move Camera Smoothly for Animation
Smooth camera movement is essential for creating professional-looking animations in Blender. Abrupt or uneven motion can distract viewers, while controlled movement helps guide attention and enhance storytelling. Learning how to move the camera smoothly ensures that transitions feel natural and visually pleasing.
The foundation of smooth camera motion starts with keyframes. By inserting keyframes for the camera’s location and rotation, you define where the camera begins and ends its movement. Blender then interpolates the motion between these points, creating a continuous flow rather than sudden jumps.
Timing plays a major role in smooth animation. Spacing keyframes too closely can make movement feel rushed, while placing them farther apart allows the camera to glide naturally. Adjusting the timing in the timeline helps control speed and rhythm without changing the actual path.
Using the Graph Editor further refines camera motion. By editing animation curves, you can soften starts and stops, eliminating harsh acceleration. Gentle ease-in and ease-out curves create cinematic movement that feels intentional and polished.
Another effective technique is using constraints or following a path. This helps maintain consistent direction and prevents unwanted shaking. It is especially useful for fly-throughs or tracking shots.
Smooth camera animation comes from planning and refinement. With careful keyframing and curve adjustments, the camera becomes a storytelling tool that enhances motion rather than distracting from it.
Common Camera Movement Problems
Camera movement issues are common in Blender, especially for beginners, and they can greatly affect the quality of a scene or animation. Even small mistakes in camera handling can lead to awkward framing, unwanted motion, or unprofessional results. Understanding these problems helps prevent them early in the workflow.
One frequent issue is jerky or uneven camera motion during animation. This usually happens when keyframes are placed too close together or when interpolation settings are left unrefined. Without smoothing the animation curves, camera movement can feel mechanical and distracting.
Another common problem is accidental camera rotation. While moving the camera, it is easy to unintentionally rotate it slightly, causing tilted or misaligned shots. This often occurs during free movement in the viewport and can be avoided by using axis locking or adjusting values numerically.
Clipping issues also affect camera movement. Objects may disappear or pop into view when the camera moves closer or farther away. This is caused by incorrect near or far clipping distances, which become more noticeable during animated movement.
Working in complex scenes can lead to selecting and moving the wrong object instead of the camera. This results in unexpected framing changes and wasted time. Clear object naming and organized collections reduce this confusion.
By recognizing these common camera movement problems, artists can adjust their workflow to maintain smoother motion, consistent framing, and more professional-looking results.
Pro Tips for Better Camera Control in Blender
Better camera control in Blender comes from combining good habits with smart use of tools. One of the most effective tips is to always work with a clear camera purpose. Before moving the camera, decide what the shot needs to show and where the viewer’s focus should be. This reduces unnecessary adjustments and keeps framing intentional.
Using camera view frequently improves accuracy. Switching to camera view allows you to judge composition in real time and prevents surprises during rendering. Locking the camera to the view while adjusting framing makes movement feel more natural and helps achieve precise alignment without guesswork.
Another useful tip is to rely on numeric input when precision matters. Adjusting location and rotation values in the Properties Panel helps maintain consistency, especially in animations or scenes with multiple shots. This approach avoids accidental tilts and uneven positioning that can happen with free movement.
Organizing cameras properly also improves control. Renaming cameras and placing them in dedicated collections makes selection easier and prevents mistakes in complex scenes. This is especially helpful when working with multiple camera angles.
For animation, smoothing motion in the Graph Editor is essential. Refining curves eliminates harsh starts and stops, resulting in cinematic movement. Subtle easing adds realism and professionalism.
Strong camera control develops over time, but using these tips consistently leads to cleaner framing, smoother motion, and a more confident Blender workflow overall.
People Also Asked
How Do You Move the Camera in Blender for Beginners?
If you are new to Blender, moving the camera can feel confusing at first, but it becomes simple once you understand the basics. You can select the camera like any other object and use the G key to move it and R to rotate it. Pressing Numpad 0 lets you see through the camera, making it easier to position correctly. This method helps you frame your scene accurately while learning how the camera behaves in 3D space.
What Is the Easiest Way to Move the Camera in Camera View?
The easiest way to move the camera is by working directly in camera view. When you press Numpad 0, you see exactly what the camera sees. Enabling Lock Camera to View allows you to move the camera using normal viewport navigation. This method feels intuitive because you adjust the shot visually instead of guessing positions. It is especially useful for composition and fine framing.
How Can You Move the Camera Smoothly for Animation?
To move the camera smoothly, you should use keyframes instead of manual movement. Insert keyframes for location and rotation at different points on the timeline, then let Blender interpolate the motion. You can refine the movement in the Graph Editor to remove sudden acceleration. Smooth curves help the camera glide naturally, making animations look professional and cinematic.
Why Does the Camera Move Incorrectly in Blender?
Camera movement issues usually happen because of accidental rotations, incorrect axis movement, or poor keyframe spacing. If the camera tilts or shifts unexpectedly, you may have rotated it unintentionally. Using axis locking and numeric values helps prevent this. In animation, uneven motion often means the animation curves need smoothing.
How Do You Precisely Control Camera Position in Blender?
For precise control, you should adjust the camera using the Properties Panel. By entering exact location and rotation values, you avoid guesswork and maintain consistency. This is useful for architectural scenes, product renders, or repeated shots. Numeric control ensures accurate alignment and predictable results.
Can You Use Multiple Ways to Move the Camera in Blender?
Yes, you can combine several methods for better control. You might move the camera roughly in the viewport, fine-tune it in camera view, and finalize positioning with numeric values. This flexible workflow allows you to work faster and achieve better composition. Using multiple approaches helps you adapt to different scene requirements efficiently.
Conclusion
Mastering camera control is a major step toward creating professional-looking scenes and animations in Blender. When you understand how camera movement works, framing becomes intentional, motion feels smoother, and your final renders communicate ideas more clearly. Camera control is not just a technical skill, but a creative one that shapes how viewers experience your work.
Learning how to move camera in blender involves combining several techniques, from viewport navigation and keyboard shortcuts to camera view adjustments and precise numeric controls. Each method serves a different purpose, and together they give you flexibility and confidence while working on any type of project.
As you practice, camera movement becomes more natural and less distracting. Instead of struggling with positioning, you can focus on composition, storytelling, and visual flow. With consistent use of these techniques, your scenes will feel more polished, dynamic, and visually engaging across both still renders and animations.