How to Improve iPhone Camera Quality
The iPhone camera has become a daily companion for capturing memories, work moments, and creative shots. From quick snapshots to carefully framed photos, people rely on it more than ever. Getting consistently sharp, vibrant images can feel challenging, even with advanced hardware in hand.
Many users are unaware that small adjustments and better habits can dramatically change the final result. Lighting choices, camera settings, and shooting techniques all play a role in how photos turn out. Learning to use the camera more intentionally makes everyday shots look more professional.
Understanding how to improve iPhone camera quality is not about buying extra gear or using complicated tools. It comes down to knowing what the camera can already do and using it correctly. Simple changes can unlock details, color accuracy, and clarity that often go unnoticed.
With the right approach, your iPhone can produce photos that stand out on social media, in personal albums, or even for professional use. Improving camera quality is a skill that grows with practice, awareness, and a few smart tweaks.
How to Improve iPhone Camera Quality?
Improving your iPhone photos starts with understanding light. Natural light always delivers the best results, especially during early morning or late afternoon. Avoid harsh overhead lighting and direct flash whenever possible, as they can wash out details. Positioning your subject toward a light source helps the camera capture sharper textures and more balanced colors.
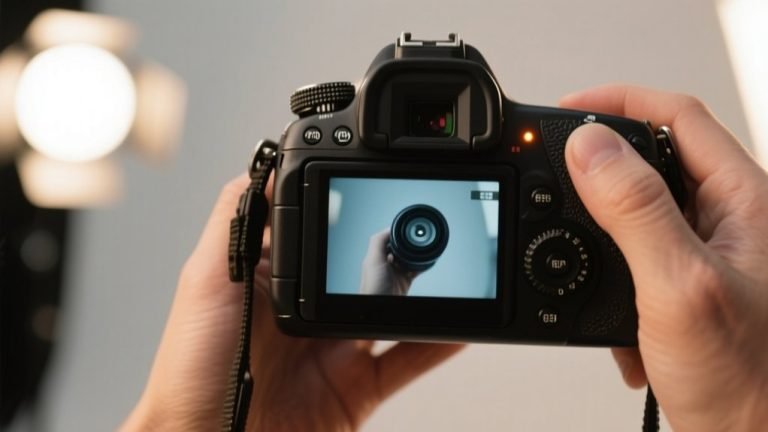
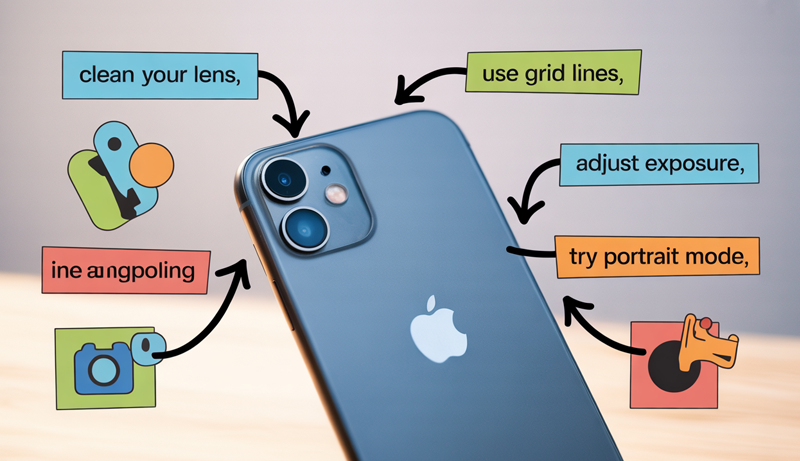
Another effective way to enhance results is by keeping the lens clean. A small smudge or fingerprint can reduce clarity without being noticeable to the eye. Wiping the lens gently with a microfiber cloth before shooting ensures crisp images. This simple habit alone can make a surprising difference in photo sharpness.
Learning how to improve iPhone camera quality also involves using built-in camera features. Tools like HDR, grid lines, and exposure control help you compose better shots. Adjusting exposure by tapping the screen allows you to manage brightness and avoid overexposed highlights. These features are designed to improve image balance when used correctly.
Stability plays a major role in photo quality. Holding the phone with both hands or resting it against a solid surface reduces motion blur. For low-light shots, keeping the phone steady is especially important since the camera needs more time to capture light. Even small movements can affect clarity.
Editing is the final step that brings photos to life. Using the iPhone’s native editing tools, you can fine-tune brightness, contrast, and sharpness without overdoing it. Subtle edits enhance details while keeping images natural. Consistent practice and mindful shooting habits gradually lead to noticeably better results.
Clean Your iPhone Camera Lens
A clean camera lens is one of the most overlooked factors in photo quality. Since your iPhone is handled frequently, the lens easily collects fingerprints, dust, and oil from your hands. These invisible marks can soften images, reduce sharpness, and create unwanted glare, especially in bright light.
Before taking any photo, it helps to make lens cleaning a habit. A quick wipe can instantly restore clarity and detail. Many blurry or hazy photos are not caused by poor lighting or camera settings, but simply by a dirty lens blocking light from entering properly.
Using the right material is important when cleaning your iPhone camera lens. A soft microfiber cloth works best, as it removes smudges without scratching the glass. Avoid using tissues, paper towels, or clothing fabric, since they may leave lint or cause micro-scratches over time.
For stubborn smudges, lightly dampening the cloth with clean water is enough. There is no need for harsh cleaning sprays or chemicals, which may damage the lens coating. Gentle circular motions help lift dirt without applying pressure.
Keeping the lens clean also improves consistency in your photos. Colors appear more accurate, details look sharper, and low-light images suffer less from flare. Making lens cleaning part of your routine ensures your iPhone camera performs at its best every time you capture a moment.
Use the Best iPhone Camera Settings
Using the right camera settings can dramatically elevate photo quality without relying on editing apps. The iPhone camera includes powerful built-in tools designed to improve composition, exposure, and detail. When these settings are used correctly, photos appear more balanced, sharper, and visually pleasing. Understanding how and when to apply each option allows you to take full advantage of the camera’s capabilities in everyday shooting situations.
Enable Grid Lines for Better Composition
Grid lines are a simple but powerful tool that helps improve photo composition. When enabled, the screen is divided into nine equal sections using two horizontal and two vertical lines. This layout follows the rule of thirds, a classic photography principle that places the subject along these lines or at their intersections instead of dead center.
Using the rule of thirds creates more natural and engaging photos. Placing a subject slightly off-center adds balance and visual interest, making images feel less static. Landscapes benefit greatly from this technique, especially when the horizon aligns with either the top or bottom grid line rather than the middle of the frame.
Grid lines also help maintain straight horizons and vertical lines. This is particularly useful for architecture, cityscapes, or any scene with strong geometric elements. Keeping buildings and horizons aligned prevents photos from appearing tilted or unbalanced.
Beyond composition, grid lines improve framing awareness. They help you notice distractions near the edges of the frame and encourage cleaner shots. Over time, using grid lines trains your eye to naturally compose better photos, even without relying on the on-screen guide.
Adjust Exposure and Focus Manually
Automatic focus and exposure work well in many situations, but manual control offers greater precision. Tapping on the screen tells the camera exactly where to focus, ensuring the subject remains sharp. This is especially useful for portraits, close-up shots, and scenes with multiple focal points.
After tapping to focus, an exposure slider appears next to the focus box. Sliding up or down allows you to control brightness manually. Lowering exposure prevents overexposed highlights, while increasing it brings out details in darker areas. This simple adjustment can drastically improve photo balance.
Manual exposure control is especially helpful in high-contrast lighting. Scenes with bright skies and darker subjects often confuse automatic settings. Adjusting exposure manually helps preserve details without losing important highlights or shadows.
Locking focus and exposure by holding your finger on the screen ensures consistency. This feature is useful when shooting moving subjects or recording video, as it prevents the camera from constantly readjusting. Mastering tap-to-focus and exposure control gives you creative control and more reliable results.
Turn On Smart HDR
Smart HDR enhances photos by capturing multiple images at different exposures and blending them into one balanced shot. This process improves dynamic range, allowing the camera to retain detail in both bright and dark areas. The result is a photo that closely resembles what the human eye sees.
HDR is especially effective in scenes with strong lighting contrasts, such as outdoor shots with bright skies and shaded foregrounds. It helps preserve cloud texture while keeping subjects properly exposed. Skin tones also appear more natural when HDR is used correctly.
There are situations where HDR may not be ideal. Fast-moving subjects can appear slightly blurred due to the multiple exposures being combined. In these cases, turning HDR off may produce cleaner results. Low-light indoor scenes may also benefit from HDR being disabled to avoid unnatural brightness.
Understanding when to use or avoid HDR is key. Leaving Smart HDR on for general photography works well, but recognizing challenging scenarios allows you to adjust settings for better accuracy and realism in your photos.
Use the Highest Photo Resolution
Choosing the highest photo resolution ensures maximum detail and flexibility. iPhones typically offer HEIF and JPEG formats. HEIF provides better quality at smaller file sizes, making it ideal for everyday use. JPEG offers wider compatibility but results in larger files with slightly less efficiency.
For users who edit photos frequently, resolution matters even more. Higher-resolution images retain clarity during cropping or adjustments. Selecting the best format ensures your photos maintain sharpness and color accuracy throughout the editing process.
Some iPhone models support ProRAW, which captures significantly more image data. ProRAW files preserve details in highlights and shadows, offering greater control during editing. This format is ideal for photographers who want professional-level adjustments without sacrificing image quality.
However, higher resolutions and ProRAW files take up more storage. Balancing quality and storage space is important. Using the highest resolution when quality matters most, such as landscapes or portraits, ensures your iPhone camera delivers its full potential.
Improve Lighting for Better iPhone Photos
Lighting is one of the most important elements in photography, and it plays a major role in how your iPhone photos turn out. Good lighting enhances details, improves color accuracy, and reduces noise, while poor lighting can make even the best camera struggle. Learning how to recognize, use, and control light helps you capture clearer, more visually appealing images in any situation.
Use Natural Light Whenever Possible
Natural light is the most reliable and flattering light source for iPhone photography. It produces soft shadows, accurate colors, and balanced exposure without requiring extra effort. Positioning your subject near a window or shooting outdoors often results in sharper and more natural-looking photos compared to artificial lighting.
The best time to shoot using natural light is during the golden hour, which occurs shortly after sunrise and before sunset. During this time, sunlight is softer and warmer, creating a gentle glow that enhances skin tones and textures. Shadows are less harsh, and highlights are easier for the camera to manage.
Midday light can still be used, but it requires more awareness. The sun is stronger and creates higher contrast, which can lead to blown-out highlights or deep shadows. When shooting during this time, finding shaded areas helps diffuse the light and creates more balanced results.
Indoor natural light can be just as effective. Facing your subject toward a window rather than placing light behind them prevents silhouettes and uneven exposure. Moving slightly closer or farther from the light source allows you to control brightness without changing camera settings.
Avoid Harsh Direct Light
Harsh direct light often creates strong shadows and overly bright highlights, which can reduce image quality. This type of lighting commonly occurs under direct sunlight, overhead indoor lights, or strong artificial sources. Managing harsh light helps your iPhone capture more even and detailed photos.
One effective way to reduce harsh light is by diffusing it. Shooting in open shade, using curtains, or positioning subjects away from direct beams softens shadows and creates a smoother look. Diffused light spreads more evenly across the subject, making photos appear more natural.
Understanding how shadows fall is also important. Shadows can add depth, but uncontrolled shadows may distract from the subject. Adjusting your angle or repositioning your subject slightly can reduce unflattering shadow patterns on faces or objects.
Highlights should be monitored carefully. Overexposed areas lose detail permanently. Tapping the screen and lowering exposure slightly helps preserve highlights while keeping the subject visible. Avoiding harsh light conditions whenever possible allows the camera to work more efficiently and produce cleaner images.
Use Night Mode Correctly
Night Mode is designed to improve low-light photography by capturing more light over a longer period. While it activates automatically in dark environments, using it correctly requires stability and awareness. Keeping the phone steady is the most important factor for sharp Night Mode photos.
Holding the phone with both hands, bracing your arms against your body, or resting the phone on a solid surface reduces motion blur. Even small movements during exposure can affect image clarity, especially when Night Mode uses longer capture times.
Night Mode allows you to adjust exposure duration manually. Sliding the exposure control lets you increase or decrease how long the camera captures light. Longer exposure times brighten the image but require extra stability, while shorter times reduce blur at the cost of brightness.
Knowing when to limit exposure is essential. Scenes with moving subjects, such as people or cars, benefit from shorter exposure times to avoid ghosting. Static scenes, like buildings or landscapes, allow longer exposures for better detail. Using Night Mode thoughtfully helps balance brightness, sharpness, and realism in low-light photos.
Master iPhone Camera Features
The iPhone camera includes advanced features that go beyond basic point-and-shoot photography. Learning how to use these tools properly allows you to capture more creative, sharp, and dynamic images. Features like Portrait Mode, Live Photos, and Burst Mode are designed to handle specific shooting situations, and when used correctly, they significantly improve both image quality and timing.
Use Portrait Mode Effectively
Portrait Mode is designed to create depth by keeping the subject sharp while softly blurring the background. To achieve the best results, maintaining the proper distance from the subject is essential. The iPhone typically guides you on-screen if you are too close or too far, and following these prompts helps the camera detect depth accurately.
Distance affects how natural the background blur appears. Standing too close can distort facial features, while being too far may reduce the depth effect. Keeping a comfortable distance ensures clean edge detection and smooth separation between the subject and the background.
Background choice plays a major role in Portrait Mode quality. Simple, uncluttered backgrounds work best because they allow the blur effect to stand out. Busy or highly textured backgrounds can confuse depth detection and create uneven blur around the subject’s edges.
Lighting also influences Portrait Mode performance. Even lighting across the subject improves accuracy and prevents harsh shadows on the face. Natural light works especially well, helping skin tones appear realistic while maintaining sharp focus. With thoughtful positioning, Portrait Mode delivers professional-looking portraits without extra effort.
Use Live Photos to Capture the Perfect Shot
Live Photos record a few seconds before and after you press the shutter, capturing motion and sound along with the image. This feature is extremely useful for moments where timing matters, such as candid expressions, moving subjects, or group photos.
One of the biggest advantages of Live Photos is the ability to choose the best frame afterward. By opening the photo and selecting “Edit,” you can scroll through multiple frames and pick the sharpest or most flattering moment. This eliminates the frustration of missed timing.
Live Photos are especially helpful in situations where subjects blink, move suddenly, or change expressions. Instead of retaking the photo multiple times, you can select the exact frame where everything looks right. This is ideal for portraits, kids, pets, or casual action shots.
Stability still matters when using Live Photos. Holding the phone steady ensures all captured frames remain sharp. While Live Photos use more storage than standard images, the flexibility they provide makes them valuable for capturing moments that would otherwise be difficult to time perfectly.
Try Burst Mode for Action Shots
Burst Mode is designed for fast-moving subjects where timing is unpredictable. When activated, the camera takes multiple photos in rapid succession, allowing you to choose the best shot afterward. This feature is ideal for sports, wildlife, children, or any scene with quick motion.
Burst Mode works best when the subject is continuously moving rather than briefly posing. Holding the shutter button captures a sequence of images, increasing the chance of freezing the perfect moment. This is especially useful when facial expressions or body positions change rapidly.
Lighting plays an important role in Burst Mode performance. Bright environments help the camera maintain faster shutter speeds, resulting in sharper images. Low-light conditions may reduce clarity, so using Burst Mode outdoors or in well-lit areas produces better results.
After capturing burst photos, you can review the sequence and select the sharpest images. The camera groups them together, making it easy to keep only the best shots and discard the rest. Burst Mode simplifies action photography by removing the pressure of perfect timing and letting you focus on the moment.
Avoid Overusing Digital Zoom
Digital zoom can significantly reduce photo quality when used excessively. Unlike optical zoom, digital zoom simply enlarges a portion of the image, which leads to loss of detail and visible softness. Many iPhone photos appear blurry or grainy because the camera is digitally stretching the image rather than capturing more information.
When you use digital zoom, the camera crops into the frame and enlarges pixels. This process lowers resolution and makes images look less sharp, especially in low-light conditions. Fine textures, facial details, and edges often lose clarity, resulting in photos that look less professional.
A better approach is to move closer to your subject whenever possible. Physically changing your distance allows the camera to capture full-resolution details without sacrificing quality. This method preserves sharpness and gives you more flexibility during editing.
If moving closer is not an option, using optical zoom on supported iPhone models is a safer choice. Optical zoom relies on the camera lens rather than software, maintaining image quality. Switching between available lenses provides clearer results compared to digital zooming.
Cropping during editing is another alternative. Taking the photo without zoom and cropping later retains more detail than zooming in while shooting. This approach gives you control over framing while protecting image quality.
Using digital zoom sparingly ensures your iPhone photos remain crisp and detailed. Being mindful of how zoom affects resolution helps you capture cleaner images and maintain consistent photo quality across different shooting situations.
Edit Photos to Enhance Quality
Editing is a powerful step that helps refine your iPhone photos and bring out their full potential. Even well-composed images benefit from subtle adjustments that improve balance, clarity, and color accuracy. The goal of editing is not to change the photo completely, but to enhance what is already there while keeping the image natural and visually pleasing.
Use the Built-In Photos App
The built-in Photos app on the iPhone offers a wide range of editing tools that are easy to use and surprisingly effective. It allows you to make quick improvements without needing additional apps or technical knowledge. Simple adjustments can dramatically improve how a photo looks while maintaining its original quality.
Brightness and exposure controls help correct photos that appear too dark or too bright. Slightly increasing brightness can reveal hidden details, while lowering exposure prevents washed-out highlights. These small tweaks help balance the overall lighting without affecting image realism.
Contrast adjustments add depth by increasing the difference between light and dark areas. Used carefully, contrast makes photos appear more dynamic and defined. Too much contrast, however, can crush shadows or remove subtle details, so gradual changes work best.
Sharpness tools enhance edges and fine details, making photos appear clearer. A small increase in sharpness improves clarity, especially in portraits or landscape shots. Over-sharpening should be avoided, as it can create noise and unnatural outlines.
The Photos app also includes sliders for highlights, shadows, warmth, and saturation. These tools allow you to fine-tune colors and tones with precision. Using them sparingly ensures your photos look polished while still natural and realistic.
Best Third-Party Editing Apps
Third-party editing apps provide additional control and creative flexibility for users who want more advanced options. These apps are especially useful when built-in tools feel limiting or when more precise adjustments are needed. They often include features such as selective editing, advanced color grading, and noise reduction.
Editing apps are most useful when working with challenging photos. Low-light images, high-contrast scenes, or photos taken in difficult lighting conditions often benefit from more advanced correction tools. Apps designed for photography allow you to recover details and fine-tune tones more accurately.
Many third-party apps offer presets that apply consistent edits across multiple photos. This is helpful for maintaining a uniform style, especially for social media or portfolios. Presets save time while still allowing manual adjustments if needed.
Knowing when to use editing apps is important. Not every photo requires heavy editing, and relying on apps for every image can lead to over-processing. Third-party tools should enhance quality, not overpower the original image.
Avoiding over-editing is crucial for maintaining photo realism. Excessive saturation, extreme contrast, or heavy filters can make photos look artificial. Subtle adjustments preserve natural colors and textures while still improving visual impact. Thoughtful editing ensures your photos remain clean, balanced, and visually appealing without losing authenticity.
Update iOS for Camera Improvements
Keeping your iPhone updated with the latest iOS version plays an important role in improving camera performance. Apple regularly releases software updates that include camera enhancements, bug fixes, and performance optimizations. These updates are designed to make the camera more efficient, responsive, and capable of producing better-quality photos and videos.
New iOS updates often bring improvements to image processing. Even though the camera hardware remains the same, updated algorithms can enhance sharpness, color accuracy, and low-light performance. Many users notice better detail and more natural tones after installing the latest update, especially in challenging lighting conditions.
Camera features are also refined through iOS updates. Functions like Night Mode, Smart HDR, Portrait Mode, and video stabilization may receive behind-the-scenes improvements. These changes help the camera make smarter decisions automatically, resulting in more consistent and reliable results across different shooting scenarios.
Updating iOS can also fix camera-related bugs. Issues such as camera lag, focus problems, exposure inconsistencies, or app crashes are often resolved through system updates. Keeping your device up to date ensures smoother camera operation and fewer interruptions when capturing photos or videos.
Security and compatibility are additional benefits. Updated iOS versions ensure better compatibility with third-party camera and editing apps, allowing them to perform at their best. This prevents glitches that may affect photo quality or editing accuracy.
Making it a habit to check for iOS updates helps maintain your iPhone’s camera performance over time. With each update, Apple continues refining the camera experience, ensuring you get the best possible results from your device without changing any hardware.
Fix Common iPhone Camera Problems
Even with advanced technology, iPhone camera issues can occasionally affect photo quality and performance. Problems like blurry images or a lagging camera app are common and usually easy to fix without professional help. Understanding the causes behind these issues allows you to restore normal camera function quickly and avoid missing important moments.
iPhone Camera Blurry Photos
Blurry photos are one of the most common iPhone camera complaints and usually stem from simple issues. The first thing to check is the camera lens. Smudges, fingerprints, or dust can significantly reduce sharpness, so cleaning the lens with a microfiber cloth often solves the problem instantly.
Focus problems are another frequent cause. Tapping the screen to focus on your subject ensures the camera locks onto the correct point. If the subject is moving or the lighting is low, the camera may struggle to focus automatically, resulting in soft images.
Camera shake can also lead to blur, especially in low-light conditions. Holding the phone with both hands, stabilizing your arms, or resting the phone against a solid surface helps reduce motion blur. Using a timer can also prevent slight movement caused by pressing the shutter button.
Low lighting affects shutter speed, which can make photos appear blurry. Improving lighting or enabling Night Mode helps the camera capture clearer images. If blur persists, restarting the phone refreshes system processes that may interfere with camera performance.
Camera App Lag or Freezing
Camera app lag or freezing can be frustrating, especially when trying to capture fast moments. One of the quickest solutions is restarting your iPhone. A restart clears temporary system issues and frees up memory that may be slowing down the camera app.
Storage space plays a major role in camera performance. When storage is nearly full, the camera may lag or fail to save photos properly. Deleting unused apps, clearing old videos, and removing duplicate photos helps restore smooth operation.
Closing background apps also improves performance. Too many running apps consume system resources, which can cause the camera app to respond slowly. Swiping away unused apps ensures the camera has enough processing power to function properly.
If lag continues, resetting camera-related settings may help. Resetting all settings does not erase data but restores system configurations to default, resolving hidden conflicts. Keeping iOS updated is also important, as updates often fix camera bugs and improve app stability.
iPhone Photography Tips for Professional-Looking Photos
Creating professional-looking photos with an iPhone is more achievable than many people realize. Modern iPhone cameras are powerful, but the difference between an average photo and a polished one often comes down to technique. By paying attention to composition, lighting, and timing, you can dramatically improve the quality of your images without using professional equipment.
Composition is one of the most important photography skills to master. Keeping the subject cleanly framed, avoiding cluttered backgrounds, and leaving enough space around the subject instantly makes photos look more intentional. Using simple composition principles helps guide the viewer’s eye and gives your photos a balanced, professional feel.
Lighting plays a major role in photo quality. Soft, even lighting brings out details and natural colors, while poor lighting can make images look flat or noisy. Positioning your subject near natural light sources and avoiding harsh overhead lighting helps achieve cleaner and more flattering results.
Focus and stability also matter. Always tap to focus on your main subject and hold the phone steady while shooting. Even slight movement can affect sharpness, especially in low-light situations. Taking an extra second to stabilize the phone often leads to noticeably clearer images.
Editing should be subtle and purposeful. Small adjustments to brightness, contrast, and sharpness enhance details without making photos look artificial. Over-editing can quickly reduce image quality, so aim for a natural finish.
Consistency is what ultimately makes photos look professional. Practicing these techniques regularly trains your eye and improves your confidence. Over time, your iPhone photos will look more refined, intentional, and visually appealing across any setting or subject.
Frequently Asked Questions (FAQs)
How Can You Improve iPhone Camera Quality Without Buying Accessories?
You can improve iPhone camera quality by using what is already built into the device. Cleaning the camera lens regularly prevents blur caused by smudges. Using natural light, tapping to focus, and manually adjusting exposure help produce sharper and more balanced photos. Enabling features like grid lines, Smart HDR, and Night Mode also improves results. Consistent shooting habits and proper settings make a noticeable difference without any extra equipment.
Does Updating iOS Really Improve iPhone Camera Quality?
Yes, updating iOS can improve camera quality. Apple frequently enhances image processing through software updates, improving sharpness, color accuracy, and low-light performance. Bugs that cause camera lag, focus issues, or exposure problems are often fixed in updates. Keeping iOS current ensures the camera works smoothly and benefits from the latest optimizations designed for your iPhone model.
Why Do iPhone Photos Look Blurry and How Can You Fix It?
Blurry photos usually occur due to camera shake, poor focus, dirty lenses, or low lighting. You can fix this by cleaning the lens, tapping the screen to focus, and holding the phone steady with both hands. In low-light conditions, use Night Mode or improve lighting. Restarting the phone can also help if the camera is not focusing properly.
Should You Use Digital Zoom on iPhone Cameras?
You should avoid overusing digital zoom because it reduces image quality. Digital zoom crops and enlarges pixels, making photos look soft and grainy. Instead, move closer to the subject or use optical zoom if your iPhone supports it. Another effective option is to take the photo without zoom and crop it later during editing to maintain better detail.
Which iPhone Camera Settings Help Improve Photo Quality the Most?
The most helpful settings include enabling grid lines for better composition, turning on Smart HDR for balanced exposure, and using the highest photo resolution available. Manually adjusting exposure and focus gives you more control over lighting. If supported, using HEIF for everyday photos or ProRAW for editing-heavy shots helps preserve detail and image quality.
Can Editing Photos Improve iPhone Camera Quality?
Yes, editing plays a key role in improving photo quality when done correctly. Using the built-in Photos app, you can adjust brightness, contrast, highlights, shadows, and sharpness to enhance details. Editing apps are helpful for difficult lighting or low-light images, but over-editing should be avoided. Subtle adjustments keep photos natural while improving clarity and visual appeal.
Conclusion
Improving your iPhone photos does not require expensive gear or professional training. With the right techniques, simple habits, and a better understanding of camera features, anyone can capture sharper, more balanced, and visually appealing images. Small changes in how you shoot often lead to noticeable improvements.
Learning how to improve iPhone camera quality comes down to using light effectively, choosing the best settings, and maintaining steady control while shooting. Features already built into the iPhone are powerful when used correctly, and consistent practice helps unlock their full potential over time.
Editing, software updates, and mindful shooting habits all work together to enhance results. When these elements are combined, your iPhone becomes a reliable tool for producing high-quality photos that look clean, professional, and well-composed in any situation.