What Is ISO in Camera? A Complete Beginner’s Guide
Photography often feels technical at first, but many camera settings are simpler than they appear. One of the most important controls affects how bright or dark your photos look and how much detail they retain in different lighting conditions.
When learning manual or semi-manual modes, beginners frequently encounter questions about sensitivity and exposure. This is where understanding what is an iso in camera becomes essential, because it directly influences how the camera reacts to light in a scene.
ISO works alongside shutter speed and aperture to create a balanced exposure. Adjusting it allows photographers to shoot in low light, freeze action indoors, or maintain image clarity without relying heavily on artificial lighting.
However, ISO is not just about brightness. Higher values can introduce grain or digital noise, which changes the overall mood and quality of an image. Knowing when and how to adjust ISO helps photographers make creative decisions with confidence.
By grasping this concept early, photographers gain better control over their camera and develop a stronger foundation for capturing consistent, high-quality images in any environment.
What Is ISO in Camera?
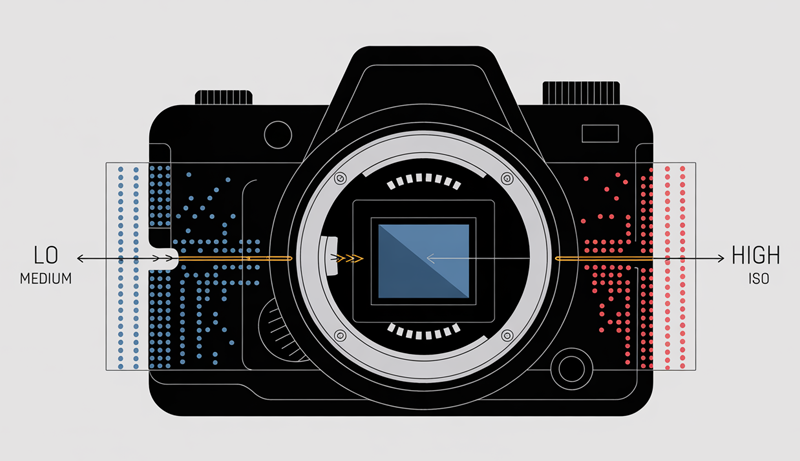
ISO is one of the three core camera settings that control exposure, alongside shutter speed and aperture. It determines how sensitive a camera’s image sensor is to light. When the ISO value is low, the sensor is less sensitive, which is ideal for bright conditions like outdoor daylight. As the ISO increases, the sensor becomes more sensitive, allowing photographers to capture images in darker environments without needing extra light sources.
Understanding what is an iso in camera helps photographers adapt to changing lighting situations quickly. For example, when shooting indoors or at night, increasing ISO can make an image brighter without slowing the shutter speed too much. This is especially useful for avoiding motion blur when photographing moving subjects or handheld shots in low light.
However, ISO adjustments come with trade-offs. Higher ISO values often introduce digital noise, which appears as grain or color speckles in an image. While modern cameras handle high ISO better than older models, excessive noise can still reduce image sharpness and detail.
Lower ISO settings generally produce cleaner and sharper images. That’s why landscape and studio photographers often prefer the lowest ISO possible, using tripods or controlled lighting to compensate for reduced sensitivity.
Knowing when to raise or lower ISO is a skill developed through practice. By balancing ISO with aperture and shutter speed, photographers can maintain image quality while achieving the desired exposure in almost any shooting condition.
What Does ISO Mean in Photography?
In photography, ISO refers to the sensitivity of a camera’s image sensor to light. The term originally came from film photography, where it described how sensitive a roll of film was to light. In digital cameras today, ISO serves the same purpose but is controlled electronically through camera settings rather than physical film.
A lower ISO value, such as ISO 100 or 200, means the sensor is less sensitive to light. This setting is ideal for bright environments like outdoor daytime scenes because it produces cleaner images with minimal noise. On the other hand, a higher ISO value, such as 1600 or 3200, increases light sensitivity, making it possible to shoot in low-light situations without using a flash.
Understanding what is an iso in camera is important because ISO directly affects image quality. As ISO increases, digital noise becomes more noticeable, which can reduce sharpness and detail. This noise often appears as grain or colored speckles across the image.
ISO works together with aperture and shutter speed to form the exposure triangle. Mastering how ISO functions allows photographers to control brightness, reduce blur, and maintain image quality across different lighting conditions.
How ISO Works in a Camera
ISO controls how sensitive a camera’s image sensor is to light, making it a key part of exposure. By adjusting ISO, photographers can brighten or darken an image without changing shutter speed or aperture. Understanding how ISO works helps balance light, motion, and image quality, especially in situations where lighting conditions change quickly or are difficult to control.
ISO and Sensor Sensitivity
At its core, ISO works by amplifying the signal received by the camera’s image sensor. When light enters the camera and hits the sensor, it is converted into electrical signals. A low ISO applies minimal amplification, while a higher ISO boosts these signals to make the image appear brighter.
This amplification process explains why ISO is often described as light sensitivity. The sensor itself does not actually become more sensitive; instead, the camera increases the gain applied to the captured data. This allows photographers to shoot in darker environments without slowing the shutter speed too much.
Lower ISO values, such as ISO 100 or 200, are ideal in bright conditions. They preserve fine details and produce images with smoother tones. Because the signal is barely amplified, the image remains clean and accurate in color.
As ISO increases, amplification also increases. While this makes darker scenes visible, it can reduce dynamic range and fine detail. Understanding this balance is essential when deciding how far to push ISO in challenging lighting situations.
ISO and Image Noise
One of the most noticeable effects of ISO is digital noise. Noise appears as grain-like texture or random colored specks across an image, especially in shadows. This happens because signal amplification also boosts unwanted electrical interference along with the actual image data.
At low ISO settings, noise is minimal because the signal remains close to its original state. Images look sharp, smooth, and detailed. This is why photographers prefer low ISO for landscapes, portraits, and studio photography where lighting can be controlled.
As ISO values rise, noise becomes more visible. Shadow areas lose detail, and colors may appear less accurate. Modern cameras use advanced noise-reduction algorithms, but these can sometimes soften textures and reduce sharpness.
Managing noise is a key part of using ISO effectively. Photographers often accept a certain level of grain in exchange for capturing the moment, especially in low-light or fast-action situations where a lower ISO is not practical.
ISO in Low-Light Photography
ISO plays a critical role in low-light photography, where available light is limited. Increasing ISO allows photographers to use faster shutter speeds, reducing motion blur when shooting handheld or capturing moving subjects indoors or at night.
In situations like concerts, events, or street photography after dark, raising ISO can make the difference between a usable image and a missed shot. Without higher ISO, the shutter speed may become too slow, resulting in blurry photos.
However, choosing the right ISO in low light requires balance. While higher ISO brightens the image, it can also exaggerate noise and reduce detail. Photographers often test their camera’s high-ISO performance to understand its limits.
Learning how far ISO can be pushed without unacceptable quality loss is part of developing technical skill. This knowledge allows photographers to react quickly and confidently when lighting conditions are unpredictable.
ISO and the Exposure Triangle
ISO works in combination with shutter speed and aperture, forming the exposure triangle. Changing one setting affects the others, and ISO often acts as the flexible adjustment when shutter speed and aperture are already optimized.
For example, a photographer may choose a wide aperture for shallow depth of field and a fast shutter speed to freeze motion. If the image is still too dark, increasing ISO becomes the logical solution.
In bright conditions, ISO is usually kept low to maximize image quality. In darker scenes, ISO compensates when aperture cannot open wider or shutter speed cannot slow down further without causing blur.
Understanding how ISO interacts with the other exposure settings allows photographers to maintain creative control. Instead of relying on automatic modes, they can make intentional choices that suit both the subject and the shooting environment.
Common ISO Values and What They Do
ISO values are presented in numbers such as 100, 200, 400, 800, and higher, and each step represents a change in how sensitive the camera sensor is to light. Understanding these common ISO values helps photographers quickly choose the right setting for different lighting conditions without guesswork.
Low ISO values, typically ISO 100 or ISO 200, are best used in bright environments. These settings produce the cleanest images with minimal noise and the highest level of detail. They are ideal for outdoor photography during daylight, landscapes, architecture, and studio shoots where lighting is controlled.
Mid-range ISO values, such as ISO 400 to ISO 800, offer a balance between brightness and image quality. These settings work well for indoor photography, cloudy outdoor scenes, or situations where light is moderate but not strong enough for the lowest ISO. Noise remains relatively low, making these values versatile for everyday shooting.
High ISO values, including ISO 1600, 3200, and beyond, are designed for low-light conditions. They allow photographers to capture images in dark environments without using a flash or extremely slow shutter speeds. This makes them useful for night photography, concerts, events, and indoor sports.
However, as ISO increases, digital noise becomes more noticeable. Images may appear grainy, especially in shadow areas, and fine details can be lost. While modern cameras handle high ISO better than older models, there is still a trade-off between brightness and image quality.
Choosing the right ISO value depends on lighting, subject movement, and desired image quality. By understanding what common ISO values do, photographers can adjust settings confidently and adapt to almost any shooting situation.
ISO and Image Quality: Understanding Noise
ISO has a direct impact on image quality, especially when it comes to digital noise. As ISO increases, images become brighter, but this brightness comes at the cost of added grain and reduced detail. Understanding how noise is created and how it affects photos helps photographers make informed ISO choices in different lighting conditions.
What Is Digital Noise in Photography
Digital noise appears as random grain, speckles, or color distortions in an image. It is most visible in darker areas, such as shadows or low-light scenes. Noise occurs because increasing ISO amplifies not only the light signal captured by the sensor but also unwanted electronic interference.
At low ISO values, the camera applies very little amplification, resulting in smooth tones and clean details. As ISO increases, the sensor signal is boosted more aggressively, and imperfections become visible. This is why images shot at high ISO often look rougher or less refined.
Noise can vary in appearance. Luminance noise looks like grain and affects brightness, while chroma noise introduces colored spots. Both types reduce overall image clarity and can make photos look less professional if not managed carefully.
Understanding the source of digital noise allows photographers to predict when it will appear and decide whether higher ISO is worth the trade-off for capturing the shot.
How High ISO Affects Image Detail
As ISO increases, image detail gradually decreases. Fine textures, sharp edges, and subtle tonal transitions can be lost due to noise and noise-reduction processing applied by the camera. This effect becomes more noticeable as ISO values rise into the higher range.
When shooting at high ISO, the camera often uses internal noise reduction to smooth out grain. While this can make images look cleaner, it may also blur small details, especially in areas like hair, foliage, or fabric textures. The result is an image that appears softer or less crisp.
Dynamic range is also affected by high ISO. Highlights may clip more easily, and shadow detail can be lost. This limits flexibility in post-processing, especially when trying to recover details from dark areas.
Photographers must balance the need for brightness with the desire for detail. In many cases, slightly underexposing at a lower ISO and adjusting later can preserve more detail than relying on very high ISO values.
Low ISO and Image Quality Advantages
Low ISO settings are preferred when image quality is the top priority. Using ISO 100 or 200 minimizes noise and preserves maximum detail, color accuracy, and dynamic range. This makes low ISO ideal for landscapes, portraits, studio photography, and any situation with sufficient light.
At low ISO, images have smoother gradients, richer colors, and sharper textures. Shadows retain more detail, and highlights are less likely to blow out. This provides greater flexibility during editing and allows for more refined final results.
Because low ISO requires more light, photographers often compensate with slower shutter speeds or wider apertures. This is not always practical, especially for moving subjects, but when conditions allow, low ISO delivers the best possible image quality.
Understanding when low ISO can be used effectively helps photographers plan their shots and choose equipment like tripods or lighting to maintain optimal quality.
Managing Noise While Using Higher ISO
Using higher ISO does not automatically mean poor image quality. Modern cameras are designed to handle noise more effectively, and photographers can take steps to manage it. Proper exposure is key, as underexposed images amplified later will show more noise.
Choosing the correct ISO for the scene reduces the need for heavy post-processing. Shooting in RAW format also helps, as it preserves more data and allows for better noise reduction during editing.
Lighting choices play an important role as well. Even small improvements in available light can allow for a lower ISO setting. Positioning subjects near light sources or using reflectors can make a noticeable difference.
By understanding how ISO affects image quality and noise, photographers can make smart decisions that balance technical limitations with creative goals, even in challenging lighting situations.
ISO and the Exposure Triangle
ISO is one of the three pillars of the exposure triangle, working alongside aperture and shutter speed to control how bright or dark an image appears. While aperture controls light entering the lens and shutter speed controls how long light hits the sensor, ISO determines how strongly that light signal is amplified. Understanding ISO’s role within this triangle helps photographers maintain exposure balance without sacrificing creative intent.
How ISO Complements Aperture and Shutter Speed
ISO acts as a support system when aperture and shutter speed reach their practical limits. For example, a photographer may already be using a wide aperture for shallow depth of field and a fast shutter speed to freeze motion. If the image is still underexposed, increasing ISO becomes the most effective solution.
Unlike aperture and shutter speed, ISO does not directly change how light enters the camera. Instead, it adjusts how the sensor processes the captured light. This makes ISO especially useful in situations where physical light control is limited, such as indoor events or nighttime scenes.
However, increasing ISO affects image quality, so it should be adjusted thoughtfully. Photographers often prioritize aperture and shutter speed first for creative reasons, then fine-tune exposure using ISO. This approach keeps artistic control intact while achieving proper brightness.
Balancing ISO and Shutter Speed for Motion Control
Shutter speed controls motion blur, making it critical for sports, wildlife, and action photography. A fast shutter speed reduces blur but also limits the amount of light reaching the sensor. In these cases, ISO plays a crucial role in compensating for the reduced exposure.
Raising ISO allows photographers to maintain fast shutter speeds in low-light conditions. This makes it possible to freeze action indoors or during evening shoots without relying on flash. Without higher ISO, images would be underexposed or unusably blurry.
The trade-off is increased noise, which becomes more noticeable at higher ISO values. Photographers must decide whether sharp motion or cleaner image quality is more important for the scene. Often, a slightly noisy but sharp image is preferred over a blur-free but unusable shot.
Understanding this balance helps photographers react quickly in fast-paced environments where lighting and movement change constantly.
ISO and Aperture in Depth of Field Control
Aperture affects both exposure and depth of field. A wide aperture lets in more light and creates background blur, while a narrow aperture reduces light and increases sharpness across the frame. ISO helps maintain exposure when creative aperture choices limit available light.
For example, landscape photographers often use narrow apertures for maximum depth of field. This reduces light entering the camera, making ISO adjustments necessary, especially during low-light conditions like sunrise or sunset.
Increasing ISO in these situations prevents overly slow shutter speeds that could cause camera shake. At the same time, photographers aim to keep ISO as low as possible to preserve detail and dynamic range.
By using ISO strategically, photographers can prioritize depth of field without compromising exposure or sharpness.
Using ISO Strategically in Manual and Semi-Auto Modes
In manual mode, photographers control ISO, aperture, and shutter speed directly. ISO becomes a flexible tool for fine-tuning exposure once creative settings are chosen. This provides full control but requires a strong understanding of how the exposure triangle works together.
In semi-automatic modes like Aperture Priority or Shutter Priority, ISO can still be adjusted manually or set to Auto ISO. Auto ISO allows the camera to adjust sensitivity automatically while the photographer focuses on creative decisions.
Strategic ISO use ensures consistent exposure across changing lighting conditions. Whether shooting manually or using assisted modes, understanding ISO’s role within the exposure triangle leads to more predictable and intentional results.
When to Use Low ISO
Low ISO is best used when there is plenty of available light. Bright outdoor conditions, such as sunny days or well-lit environments, allow photographers to keep ISO at its lowest settings, typically ISO 100 or 200. This ensures the camera sensor captures images with maximum clarity and minimal digital noise.
Using low ISO is ideal when image quality is a top priority. Lower sensitivity produces cleaner photos with smoother tones, accurate colors, and sharper details. This makes low ISO especially valuable for landscape photography, architecture, product photography, and portraits where fine detail and texture matter.
Low ISO is also preferred in controlled lighting situations. In studio photography, artificial lights provide consistent brightness, removing the need to raise ISO. Keeping ISO low helps preserve dynamic range and gives photographers greater flexibility during editing.
When shooting stationary subjects, low ISO works well because slower shutter speeds can be used without risk. Tripods are often paired with low ISO to avoid camera shake, allowing photographers to maintain image quality even in dimmer conditions.
Low ISO is also useful when large prints or high-resolution images are required. Since noise becomes more visible when images are enlarged, starting with the cleanest possible file ensures better results.
Knowing when to use low ISO helps photographers make intentional technical choices, resulting in images that are crisp, professional, and visually refined across a wide range of shooting scenarios.
When to Use High ISO
High ISO is most useful in low-light situations where there is not enough natural or artificial light to properly expose an image. Environments such as indoor events, nighttime streets, concerts, or dimly lit rooms often require higher ISO values to capture usable photos without relying on flash.
Using high ISO is especially important when a fast shutter speed is needed. In sports, wildlife, or event photography, motion blur can ruin a shot if the shutter speed is too slow. Raising ISO allows photographers to maintain faster shutter speeds while still achieving proper exposure.
High ISO is also helpful when shooting handheld in dark conditions. Without a tripod, slower shutter speeds increase the risk of camera shake. Increasing ISO compensates for the lack of light and helps produce sharper images when stability is limited.
In situations where flash is not allowed or would disrupt the scene, high ISO becomes the most practical option. Many venues restrict flash use, and natural-looking images often depend on ambient light rather than artificial bursts.
Modern cameras handle high ISO better than ever, making it possible to shoot at ISO 1600, 3200, or higher with acceptable noise levels. While some grain may appear, it is often preferable to capturing a blurry or underexposed image.
Knowing when to use high ISO allows photographers to adapt quickly to challenging lighting conditions and capture moments that would otherwise be impossible to photograph clearly.
Auto ISO vs Manual ISO
| Feature | Auto ISO | Manual ISO |
|---|---|---|
| Control | Camera automatically adjusts ISO based on lighting conditions | Photographer manually selects the ISO value |
| Ease of Use | Very beginner-friendly and convenient | Requires technical knowledge and experience |
| Speed | Fast adjustment in changing light situations | Slower, as ISO must be changed manually |
| Image Quality Control | Less precise control over noise levels | Full control over noise and image quality |
| Best Use Cases | Events, street photography, fast-changing light | Landscapes, studio work, controlled lighting |
| Risk of High Noise | Camera may choose higher ISO than desired | Photographer decides acceptable noise level |
| Creative Flexibility | Limited, camera prioritizes exposure | High, allows intentional exposure decisions |
| Consistency | Exposure stays balanced automatically | Consistent results when settings are fixed |
ISO Tips for Beginners
For beginners, understanding ISO starts with knowing that lower values generally produce better image quality. Whenever lighting conditions allow, keep ISO as low as possible, such as ISO 100 or 200. This helps reduce digital noise and ensures cleaner, sharper photos, especially when shooting outdoors or in well-lit environments.
It is helpful to adjust ISO only after considering aperture and shutter speed. Choose aperture based on depth of field and shutter speed based on motion, then use ISO to fine-tune exposure. This approach builds good habits and reinforces how the exposure triangle works together.
Beginners should not be afraid of using higher ISO when needed. In low-light situations, raising ISO can prevent blurry images caused by slow shutter speeds. A slightly noisy photo is often better than one that is out of focus or blurred by movement.
Using Auto ISO can be a smart learning tool. It allows beginners to focus on composition while the camera handles sensitivity changes. Setting an upper ISO limit helps prevent excessive noise while still benefiting from automatic adjustments.
Practicing in different lighting conditions is key to learning ISO. Try photographing the same scene at various ISO values to see how brightness and noise change. This hands-on experience builds confidence and improves decision-making.
Over time, understanding ISO becomes intuitive. With consistent practice, beginners learn when to rely on low ISO for quality and when higher ISO is necessary to capture the moment effectively.
Common ISO Mistakes to Avoid
One of the most common ISO mistakes is forgetting to reset ISO after shooting in low light. Many photographers raise ISO indoors or at night and then move to brighter conditions without lowering it. This often leads to overexposed images and unnecessary noise, even when plenty of light is available.
Another mistake is being afraid to use high ISO at all. While low ISO delivers cleaner images, refusing to increase ISO in dark environments can force very slow shutter speeds. This results in motion blur or camera shake, which is usually more distracting than moderate image noise.
Over-reliance on Auto ISO without setting boundaries is also problematic. Cameras may choose excessively high ISO values to maintain exposure, especially in tricky lighting. Setting a reasonable maximum ISO helps prevent excessive noise while still benefiting from automation.
Some photographers use ISO as the first solution instead of adjusting aperture or shutter speed. ISO should support creative choices, not replace them. Aperture and shutter speed should be selected based on depth of field and motion, with ISO adjusted afterward.
Another common error is underexposing at low ISO and trying to brighten the image later during editing. This often introduces more noise than using a slightly higher ISO at the time of capture. Proper exposure in-camera usually produces cleaner results.
Avoiding these ISO mistakes leads to better technical control, more consistent exposures, and higher-quality images across a wide range of lighting situations.
Frequently Asked Questions (FAQs)
What Is An ISO In Camera And Why Does It Matter?
ISO in a camera refers to how sensitive the camera’s sensor is to light. When you increase ISO, your camera becomes more responsive to light, making images brighter. This matters because you often face different lighting conditions, and ISO helps you adapt without changing lenses or adding extra light. Understanding ISO allows you to maintain proper exposure while balancing image quality, sharpness, and noise.
How Does ISO Affect Image Quality?
ISO directly affects image quality by influencing digital noise. When you use a low ISO, your photos appear cleaner, sharper, and more detailed. As you increase ISO, especially in low-light situations, noise becomes more visible in the form of grain or color speckles. You need to balance brightness and clarity, choosing an ISO that delivers acceptable noise while preserving important details.
When Should You Use Low ISO Settings?
You should use low ISO settings when there is plenty of light available. Bright outdoor scenes, studio photography, and landscapes are ideal situations. Low ISO helps you achieve maximum image quality, accurate colors, and strong dynamic range. If your subject is still and you can use a tripod or slower shutter speed, keeping ISO low gives you the best possible results.
When Is High ISO Necessary In Photography?
High ISO is necessary when you are shooting in low-light environments and cannot use a flash or tripod. Indoor events, night photography, concerts, and sports often require higher ISO to maintain fast shutter speeds. In these situations, capturing a sharp image is more important than avoiding all noise, and increasing ISO helps you avoid motion blur.
Is Auto ISO Better Than Manual ISO For Beginners?
Auto ISO can be very helpful when you are learning photography. It allows you to focus on composition while the camera adjusts sensitivity automatically. However, you should set a maximum ISO limit to control noise. As you gain experience, manual ISO gives you more creative and technical control, helping you understand exposure more deeply.
What Is A Good ISO Range For Beginners To Practice With?
A good ISO range for beginners is typically ISO 100 to ISO 1600. This range lets you experience how ISO behaves in both bright and low-light situations without extreme noise. Practicing within this range helps you understand exposure balance and builds confidence in choosing the right ISO for different scenes.
Conclusion
Understanding camera settings becomes much easier once you learn how sensitivity to light works. ISO plays a major role in exposure, helping you adapt to different lighting conditions while maintaining control over image brightness and clarity. When used correctly, it allows you to capture sharp and usable photos in situations where light is either abundant or limited.
Learning what is an iso in camera helps you make smarter decisions when balancing shutter speed and aperture. Instead of relying fully on automatic modes, you gain the ability to adjust your settings intentionally, choosing between cleaner images or brighter results depending on the scene.
With practice, ISO becomes an intuitive tool rather than a confusing number. Knowing when to keep it low for maximum quality and when to raise it to preserve sharpness empowers you to handle real-world photography challenges confidently. This understanding builds a strong technical foundation and improves your overall photography skills.