How to Transfer Photos from Canon Camera to Phone
Capturing moments with a Canon camera brings a level of detail and quality that phones often can’t match. After a shoot, the next natural step involves getting those photos onto a phone, where sharing, editing, and backing them up becomes easy and convenient.
Many people want quick access to their images without waiting to return home or open a computer. Moving photos directly to a phone helps keep workflows simple, especially during travel, events, or everyday photography where speed matters.
Understanding How to Transfer Photos from Canon Camera to Phone allows photographers to stay connected with their content at all times. Canon offers several practical options designed to work smoothly with modern smartphones, making the process more approachable than it may seem at first.
With the right method, transferring photos becomes part of a routine rather than a technical challenge. Once set up, images move seamlessly from camera to phone, ready for social sharing, cloud storage, or quick edits. This guide focuses on making that transition clear, efficient, and stress-free for everyday Canon users.
How to Transfer Photos from Canon Camera to Phone?
Transferring photos from a Canon camera to a phone has become an essential part of modern photography. Whether you’re a casual shooter or a content creator, having images instantly available on your phone makes sharing and editing far more convenient. Canon has designed its cameras and apps to support fast and reliable transfers without needing complicated tools.
One of the most common ways is using Canon’s mobile app, which connects your camera to your phone through Wi-Fi or Bluetooth. After pairing the devices once, the connection becomes easy to reuse. This method works well for quickly previewing images, selecting favorites, and downloading them directly to your phone’s gallery.
Another practical option is using a USB cable or adapter. Many phones support direct camera connections through OTG adapters, allowing photos to be transferred without wireless setup. This method is often faster for large files and doesn’t rely on battery-draining wireless connections, making it useful during long shooting sessions.
Some users prefer removing the SD card from the camera and inserting it into a card reader connected to their phone. This approach offers full access to all files and works reliably even when wireless features are unavailable. It’s especially helpful for photographers dealing with RAW images or large photo collections.
Learning How to Transfer Photos from Canon Camera to Phone helps streamline your workflow and keeps your photos accessible wherever you go. Once you find the method that fits your routine, transferring images becomes quick, simple, and nearly effortless.
With these options available, Canon users can focus less on technical steps and more on capturing and sharing meaningful moments.
What You Need Before Transferring Photos
Before transferring photos from a Canon camera to a phone, it’s important to prepare a few essentials to avoid interruptions during the process. Having everything ready not only saves time but also ensures a smoother and more reliable transfer experience.
First, make sure both your camera and phone are sufficiently charged. Wireless transfers, in particular, can drain battery power quickly. A low battery on either device may cause the connection to drop or the transfer to fail midway, especially when moving multiple or high-resolution images.
Next, check that your phone has enough available storage space. Photos from Canon cameras can be large, especially if they are shot in high resolution or RAW format. Clearing unnecessary files or backing up older photos in advance helps prevent storage-related issues during the transfer.
You’ll also need the correct tools based on your chosen transfer method. This may include a stable Wi-Fi or Bluetooth connection, a compatible USB cable or OTG adapter, or an SD card reader that works with your phone. Using certified or high-quality accessories reduces the risk of connection errors.
It’s equally important to keep your camera firmware and mobile apps updated. Updates often improve compatibility, fix bugs, and enhance transfer speed. An outdated app or system version can cause pairing problems or limit available features.
Finally, take a moment to understand your camera’s menu settings. Enabling wireless functions or setting file permissions ahead of time makes the actual transfer process faster and more straightforward. Preparation turns photo transferring into a simple, stress-free task.
Transfer Photos Using Canon Camera Connect App (Wi-Fi)
Transferring photos wirelessly is one of the most popular ways Canon users move images from camera to phone. The Canon Camera Connect app is designed to simplify this process by allowing direct communication between your camera and smartphone. Using built-in Wi-Fi, the app enables fast access to photos without cables, making it ideal for quick sharing, reviewing shots, and managing images on the go.
What Is Canon Camera Connect?
Canon Camera Connect is an official mobile application developed by Canon to link compatible Canon cameras with smartphones and tablets. The app supports both Android and iOS devices and is primarily used for wireless photo and video transfers, remote shooting, and basic camera control from a phone screen.
One of its key features is the ability to browse images stored on the camera directly from the phone. Users can view thumbnails, zoom in for detail, and select specific photos instead of transferring everything at once. This selective transfer helps save time and phone storage, especially when working with large image libraries.
In addition to photo transfers, the app also allows remote shooting. This means the phone can act as a live view display, letting users adjust settings like focus and shutter release without touching the camera. This feature is useful for group photos, landscapes, and tripod-based shooting.
The app also supports Bluetooth pairing on many newer Canon models. Bluetooth maintains a low-energy connection that helps reconnect Wi-Fi automatically when needed. Overall, Canon Camera Connect is built to create a smooth and user-friendly bridge between camera and phone without relying on extra hardware.
Step-by-Step Guide
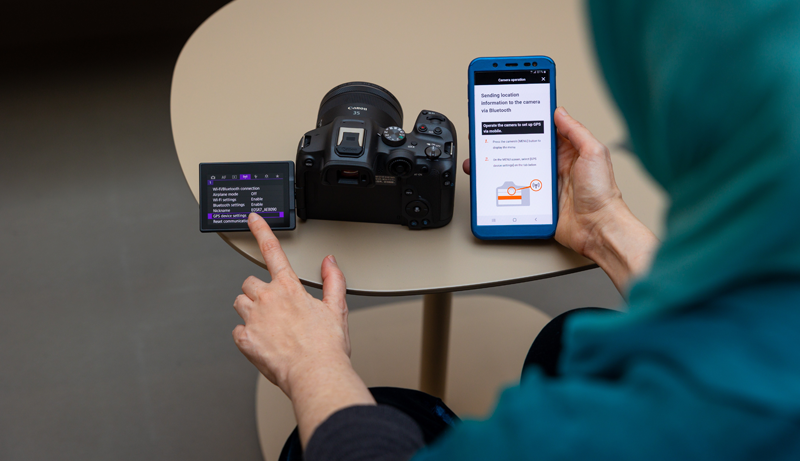
To begin transferring photos using Canon Camera Connect, the first step is enabling Wi-Fi on your Canon camera. This option is usually found in the camera’s menu under wireless communication or network settings. Once enabled, the camera creates a Wi-Fi signal that your phone can connect to directly, allowing secure data transfer.
Next, install the Canon Camera Connect app on your phone from the official app store. After installation, open the app and grant the necessary permissions, such as access to photos, storage, and location if prompted. These permissions ensure the app functions correctly and saves transferred images to your phone’s gallery.
The pairing process comes next. On the camera, select the option to connect to a smartphone. The app will search for nearby Canon cameras, and once detected, you’ll confirm the connection on both devices. Some models also display a QR code on the camera screen, which can be scanned using the app to speed up pairing.
After pairing, the app displays a menu with available options. Choose the image transfer option to access photos stored on the camera. You can browse images by date or folder, select individual photos, and start the transfer. Progress indicators show the status, and once complete, photos are saved directly to your phone.
This setup only needs to be done once. After initial pairing, future connections are much faster, making regular transfers simple and efficient.
Pros and Cons
One of the main advantages of using Canon Camera Connect is its wireless convenience. Without needing cables, card readers, or computers, users can transfer photos anytime and anywhere. This makes it especially useful for travel, events, and social media sharing when speed and portability matter most.
Another benefit is selective transferring. Instead of copying entire memory cards, users can choose only the photos they want. This saves phone storage and reduces unnecessary file clutter. The remote shooting feature also adds extra value, turning the phone into a control device for creative shooting scenarios.
However, there are some limitations to consider. Wi-Fi transfers are generally slower than using a cable or SD card reader, especially when moving large files or RAW images. Transferring many photos at once can take noticeable time, which may be inconvenient in fast-paced situations.
Battery usage is another drawback. Wireless connections consume power on both the camera and phone. Long transfer sessions can drain batteries quickly, making it less ideal when power sources are limited. Connection stability can also vary depending on distance and interference.
Despite these limitations, the app remains a reliable and easy solution for most everyday photo transfer needs.
Transfer Photos Using USB Cable (Direct Connection)
Using a USB cable offers a stable and fast way to transfer photos from a Canon camera to a phone without relying on wireless connections. This method is especially useful when dealing with large image files or when Wi-Fi is unavailable. Direct connections reduce transfer interruptions and provide full access to camera storage through supported adapters.
Using USB OTG (Android)
USB OTG, or On-The-Go, allows Android phones to act as a host device and read data from external hardware such as cameras and USB drives. When connected through an OTG adapter, the phone can directly access the Canon camera’s storage just like a computer would. Most modern Android phones support OTG, but it’s recommended to confirm compatibility in your device settings.
To begin, you’ll need a USB OTG adapter that matches your phone’s charging port, either USB-C or Micro-USB. Connect the OTG adapter to your phone, then attach the Canon camera using its standard USB cable. Turn on the camera once connected. The phone should automatically detect the camera and prompt a file access notification.
Open your phone’s file manager or storage app to view the connected device. The camera’s memory card will appear as external storage, allowing you to browse folders that contain your photos. From here, you can select images and copy them directly to your phone’s internal storage.
This method provides faster transfer speeds compared to Wi-Fi and works well for high-resolution photos and RAW files. It also avoids battery drain caused by wireless connections, making it practical for longer photo sessions.
Using Lightning / USB-C Adapter (iPhone)
Transferring photos to an iPhone requires a compatible Lightning or USB-C adapter that supports external devices. Apple offers official camera adapters designed specifically for importing photos from digital cameras. These adapters ensure stable connections and proper file recognition by the phone.
To get started, connect the adapter to your iPhone, then plug the Canon camera’s USB cable into the adapter. Power on the camera, and the iPhone should automatically launch the Photos app. If it doesn’t open, you can manually access it to begin the import process.
Inside the Photos app, the Import section displays all available images stored on the camera. You can preview photos, select individual images, or import everything at once. Once selected, the photos are copied directly into your iPhone’s photo library, where they’re immediately available for editing or sharing.
This method is highly reliable and works without installing third-party apps. It’s especially effective for photographers who prefer a straightforward, cable-based workflow. While adapters are an extra cost, they provide consistent performance and are ideal for transferring large batches of photos securely.
Transfer Photos Using SD Card Reader
Transferring photos using an SD card reader is one of the most reliable and flexible methods available. This approach works independently of camera settings, wireless connections, or specific apps, making it a dependable choice for photographers who want full control over their files.
The process starts by removing the SD card from the Canon camera and inserting it into a compatible SD card reader. Many modern phones support card readers that connect through USB-C or Lightning ports. Once connected, the phone recognizes the SD card as external storage, allowing immediate access to its contents.
Using a card reader provides fast transfer speeds, especially when working with high-resolution images or RAW files. Since the phone reads data directly from the SD card, transfers are typically quicker than Wi-Fi-based methods and remain stable even when moving large numbers of photos.
Another advantage of this method is full file access. Users can browse all folders on the SD card, select specific images, and organize them before importing. This is particularly useful for professional workflows where file management and accuracy matter.
This method also conserves battery life. Unlike wireless transfers, using an SD card reader doesn’t significantly drain the camera or phone battery. It’s a practical option for long shooting days or travel situations where charging options are limited.
With its speed, reliability, and broad compatibility, transferring photos via an SD card reader remains a trusted solution for Canon users who prefer a simple and efficient workflow.
Transfer Photos Using Bluetooth (Supported Models Only)
Transferring photos using Bluetooth is a convenient option available on select Canon camera models that support this feature. Unlike Wi-Fi transfers, Bluetooth is designed for low-energy connections, making it useful for maintaining a constant link between the camera and phone without heavy battery usage.
Bluetooth works primarily as a background connection that keeps the camera and phone paired. Once connected, it allows the devices to communicate automatically and trigger Wi-Fi when larger files need to be transferred. This makes the process smoother, especially for users who frequently move photos throughout the day.
Setting up Bluetooth transfer usually involves pairing the camera with a smartphone through the Canon mobile app. After the initial setup, the connection remains active, allowing quick access to recent photos without repeating the pairing process each time.
While Bluetooth is efficient for maintaining connectivity, it is not designed for transferring large files on its own. Most Canon cameras use Bluetooth to send smaller preview images or to initiate a Wi-Fi connection for full-resolution transfers. This limits its usefulness for bulk photo transfers.
Despite this limitation, Bluetooth excels in convenience. It consumes less power, reconnects automatically, and simplifies the overall transfer experience. For supported Canon models, Bluetooth serves as a helpful companion feature that enhances wireless photo management.
When used as intended, Bluetooth adds a layer of efficiency to photo transfers, especially for photographers who value seamless connections and minimal setup during everyday shooting.
Troubleshooting Common Issues
Transferring photos from a Canon camera to a phone usually works smoothly, but occasional issues can interrupt the process. Understanding common problems and their solutions helps restore connections quickly and prevents unnecessary frustration during photo transfers.
One frequent issue is connection failure between the camera and phone. This often happens due to disabled Wi-Fi or Bluetooth settings, outdated apps, or incorrect pairing steps. Restarting both devices and re-establishing the connection usually resolves this problem.
Slow transfer speeds are another common concern, especially with wireless methods. Large file sizes, signal interference, or background apps using bandwidth can reduce performance. Moving closer to the camera, closing unused apps, or switching to a USB or SD card method can significantly improve transfer speed.
Sometimes transferred photos fail to appear on the phone. This may be caused by restricted app permissions or incorrect storage locations. Checking app settings and ensuring access to photos and storage can help make transferred images visible in the phone’s gallery.
Battery drain can also affect photo transfers. Wireless connections consume power quickly, and low battery levels may interrupt the process. Keeping devices sufficiently charged or using a wired method helps avoid unexpected disconnections.
Addressing these common issues ensures a smoother transfer experience. With basic troubleshooting steps, most photo transfer problems can be resolved quickly, allowing uninterrupted access to your Canon images.
Tips for Faster & Safer Photo Transfers
Transferring photos efficiently requires more than just choosing a method; small adjustments can significantly improve speed and reliability. Applying a few best practices helps ensure that your photos move quickly from your Canon camera to your phone without errors or data loss.
One effective tip is to transfer photos in smaller batches. Moving too many files at once, especially high-resolution images, can slow down the process or cause interruptions. Selecting only the photos you need reduces transfer time and minimizes the risk of failed connections.
Keeping your devices updated is equally important. Camera firmware updates and mobile app updates often include performance improvements and bug fixes. Using the latest versions helps maintain compatibility and ensures smoother communication between your camera and phone.
Choosing the right transfer method also makes a difference. For large files or bulk transfers, wired options like USB cables or SD card readers are faster and more stable than wireless methods. Wireless transfers work best for quick access to a few images rather than entire photo libraries.
Battery management plays a key role in safe transfers. Always ensure both your camera and phone are adequately charged before starting. Low battery levels can interrupt transfers and potentially corrupt files during the process.
Finally, store transferred photos securely. Backing up images to cloud storage or an external drive after transferring adds an extra layer of protection. These habits help keep your photo transfers fast, safe, and reliable over time.
Frequently Asked Questions (FAQs)
Can You Transfer Photos From a Canon Camera to a Phone Without a Computer?
Yes, you can transfer photos directly from a Canon camera to a phone without using a computer. Canon offers multiple methods such as Wi-Fi through the Canon Camera Connect app, USB cable connections, SD card readers, and Bluetooth on supported models. These options allow you to access, select, and save photos directly to your phone, making the process fast and convenient wherever you are.
What Is the Easiest Way to Transfer Photos From Canon Camera to Phone?
The easiest method for most users is using the Canon Camera Connect app over Wi-Fi. Once you pair your camera with your phone, you can browse photos, select specific images, and transfer them wirelessly. This method is user-friendly, doesn’t require extra hardware, and works well for quick sharing and everyday photo transfers.
Why Won’t Your Canon Camera Connect to Your Phone?
Connection issues usually occur due to disabled Wi-Fi or Bluetooth, outdated apps, or incorrect pairing steps. Restarting both devices, updating the Canon Camera Connect app, and redoing the pairing process often solves the problem. Ensuring that permissions are enabled on your phone is also essential for a successful connection.
Does Transferring Photos Reduce Camera or Phone Battery Life?
Yes, photo transfers—especially wireless ones—can drain battery life on both the camera and phone. Wi-Fi transfers consume more power than wired options. To avoid interruptions, you should start transfers with sufficient battery levels or use wired methods like USB cables or SD card readers for longer sessions.
Can You Transfer RAW Photos From a Canon Camera to a Phone?
You can transfer RAW photos, but the method matters. Wired connections and SD card readers work best for RAW files because they are large and require stable data transfer. Some wireless methods may be slower or limited depending on your phone and camera model, but they still support RAW file transfers in many cases.
Which Method Is Best for Fast and Safe Photo Transfers?
For speed and reliability, wired methods such as USB cables or SD card readers are the best choice. They provide faster transfer speeds, stable connections, and minimal battery drain. Wireless methods are better suited for convenience and quick access to a few photos rather than large or professional photo transfers.
Conclusion
Transferring photos from a Canon camera to a phone no longer has to feel complicated or time-consuming. With multiple options available, you can choose a method that fits your workflow, whether you prefer wireless convenience or the reliability of a wired connection. Each approach offers its own balance of speed, ease, and control.
Understanding How to Transfer Photos from Canon Camera to Phone helps you stay connected to your images wherever you are. Once you become familiar with the process, accessing, sharing, and backing up photos becomes a natural part of your photography routine rather than an extra task.
By selecting the right transfer method and following best practices, you ensure your photos remain safe, accessible, and ready to use. With the right setup, moving images from your Canon camera to your phone becomes a smooth and stress-free experience.